GSX Mapper easy & free
GSX Mapper is designed for simmers who want the fun of GSX .
Most downloaded profiles become out of date after 6 months & no longer fully accepted by GSX!
With GSX Mapper you can quickly populate a parking slot with VDGS,vehicles & pushback / walker / (de)boarding paths.
 |
| Editing in GSX Mapper |
- You own GSX but gave up on profile editing because the workflow is too fiddly, technical, or time‑consuming.
- You just want to enjoy the show — passengers boarding and deboarding at any airport, from any stand, following routes you create.
- You want to design your own pushback routes quickly and visually, without wrestling with config files.
- You love seeing life on the apron — walkers at every stand, and yes, even wandering across rooftops for a bit of extra fun.
Now you can visualise GSX profiles and plot/edit any data that can be represented on a map.
|
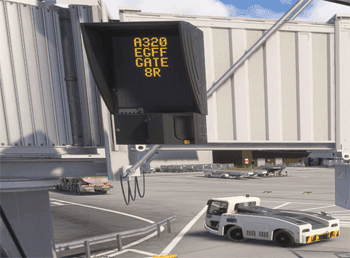 |
| VDGS |
Download version V 2.51
Quick Overview
Which Gate should I select? GSX Mapper is ideal to select the best GSX gate or parking slot. |
 Profile: EHAM Profile: EHAM |
| Eham |
Grading
Suggestions It offers targeted suggestions to help enhance the accuracy and completeness of each slot’s data. |
 |
| Gsx Mapper 2 |
Editing Data
Positions for objects or routes can be adjusted at any time, without entering the flight simulation itself.
 |
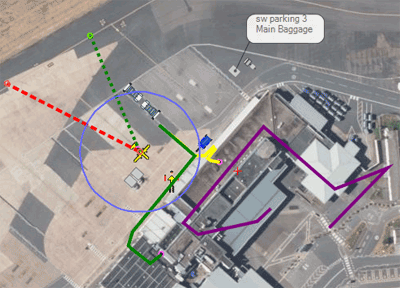
| Walkers & Deboarders |
 |
| Start at a point beyondleft wing tip of plane then draw points until 2 - 5 m from Deboarding Gate - lines' on tarmac can help you! |
GSX Profiles
- Because GSX insists on using Navdata when validating parking positions, many—if not most—GSX profiles become unreliable in less than a year. As soon as the Navdata changes, the majority of profiles, regardless of airport size, end up with parking mismatches!
- This makes it largely pointless to invest time creating detailed pushback routes or custom logic if GSX no longer recognises the parking spot itself.
- Any profile that relies on this_parking_pos or parkingsystem_stopposition is especially vulnerable, because these values are tied directly to Navdata and will break as soon as the data updates.
- The irony is that GSX is perfectly capable of locating your aircraft without this_parking_pos. In fact, the most reliable profiles are the ones that use the fewest objects. The more objects you add, the higher the risk that GSX will reject the stand entirely.
- A robust profile should start with only the essentials—typically passengerentergatepos—and build from there.
- The good news is that routes (boarding, deboarding, pushback, walkers) are safe. They are not affected by Navdata changes and can be added without risking stand recognition. That said, pushback paths are checked to see if they run through valid regions.
Improved Instructions for Creating and Refining GSX Parking Profiles
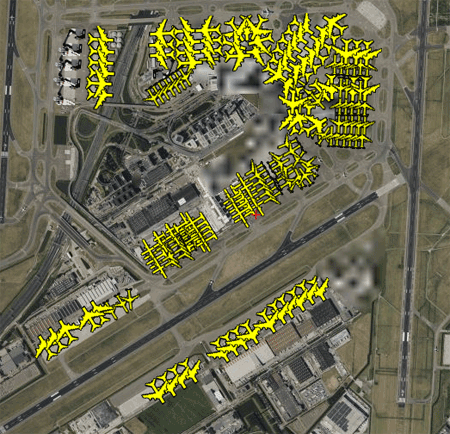
How to Map all 'valid' parking stands
With GSX Mapper you can ceate a genetal profile for all airports included in FS2020/24 based on data stored in flightsim.
Just specify an ICAO code and click create. Import this into the GSX location reserved for profiles
Click Customize Airport Positions and at the top select choose profile to ensure its using the newly created profile.
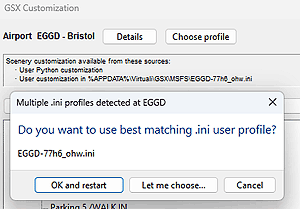
How to get GSX to accept your new profile
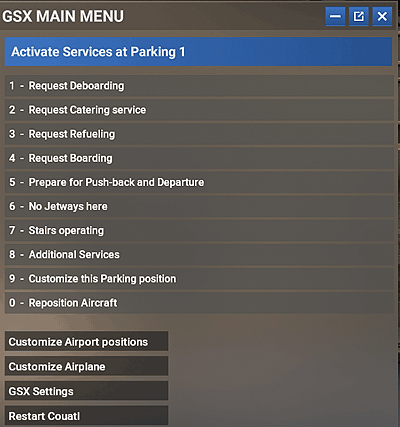
GSX will automatically read any profile related to your current airport when launching the flightsim. However, you may have to persuade it to use your profile: If you are in the flightsim itself, click GSX and from within the menu click Restart Couatl - see image below |
 |
Add Pushback Endpoints
In GSX Mapper:
- Add pushbackrightpos and pushbackleftpos by clicking where the end of each pushback should be.
- These are endpoints, not the start of the pushback.
- Save your work — this enables GSX Mapper to zoom correctly into the stand.
- Then add pushbackleftapproachpos and pushbackrightapproachpos.
- At many airports you can see the painted centreline where the aircraft would sit.
- Do not add a this_parking_pos entry.
Add Passenger Gate Positions
- Add passengerentergatepos (and _deboarding if needed).
However, GSX can be very unforgiving if you place a gate anywhere where you see a building ,implying that it must rely on some data . If it refers to an error and the idea of opening its log, the only way to avoid the loop is to take out the gatepos entry! - Check your bus settings:
- For boarding routes (green): add nopassengerbus = 1
- For deboarding routes (yellow): add nopassengerbus_deboarding = 1
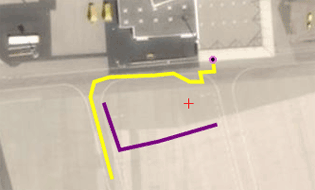
Create a Boarding Route
- Add a boarding route (yellow).
- Imagine the aircraft parked on the stand.
- Place your first point roughly halfway along the left wingtip, slightly beyond it.
- Then click your way toward the terminal gate.
- Finish the route near the gate entrance.
Smooth turns:
- To avoid sharp, jerky 90° turns, aim for 30° angles at each corner.
|
Select Customize Airport Positions to enter GSX Editor
Select Restart Couatl to force GSX to reload your profile. |
'This Parking is Isolated'
When you hear this audible warning, it means that one or more coordinate entries in your profile do not match the Navdata
To resolve ths issue:
- Check all coordinate based entries to a parkingsystem .ie parkingsystem_objectposition = etc which includes coordinates.
Review anything in your profile that references a parking system or aircraft position, such as:'this_parking_pos' - After correcting any coordinates, save the updated profile.
- Load couatladdons.ini and REMOVE reference to your profile - more than likely near the bottom of the file.
- Press ESC and select END Flight
- Reposition yourself at the last gate/ramp
- You will here This Parking is Isolated' when reentering the flightsim but your profile should load properly. If not , check the coordinates of anything related to the plane - ie stop position etc .
Stairs,Baggage,Walkers , Boarders, Deboarders, Pushback routes should not cause the 'error' message.